If you’ve read my Mother’s Day Post about making cake pops then you know it can be a big ordeal. This year my kids decided to get a jump on things and make them early. One thing that we have never had was a cake pop stand. We have always used a thick piece of styrofoam to sit them in while they dried. Over the years I have added multiple to my Amazon wishlist but never purchased one. It seems I would always forget about ordering one until I needed it again. This project would make a perfect Christmas gift sure to be cherished for years.
When the kids said that they wanted to make cake pops to have for Mother’s Day, I realized that I still hadn’t ordered a stand. Rather than make do with styrofoam again this year we decided to make our own. I used this cake pop stand as my inspiration and got to work.
supplies
- 1″ x 12″ board
- Saw (or have your board pre-cut to the desired length at your local hardware store)
- Drill
- Drill bits
- Measuring tape
- Ruler
- Sander
- Screws for adding feet
- Graph paper
- Pencil

getting started
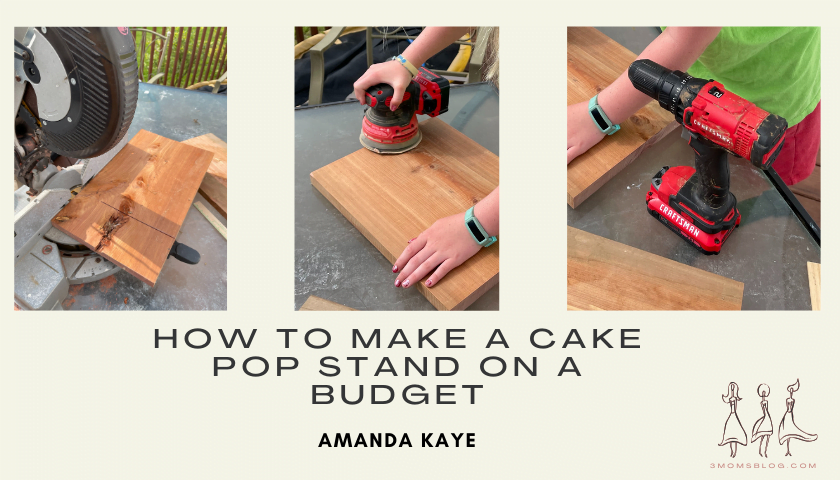
We had a 1”x12” cedar board left over from a project we completed a few years ago so we decided to use it for our cake pop stand. It had a few knots in it, so we decided to cut around those. We measured the board, drew our lines, and then made our first cut. Our board is larger than our saw would cut so we had to flip around and make a cut from the other side. We repeated this process three more times until we had two sections of board to make our cake pop stands out of.

Once we had the boards cut the next step was to sand them down. Kaye used the sander to smooth down any rough spots on the boards.

Next, we used graph paper to draw out the spacing for our cake pop holes. When we figured out how far we wanted each hole, we drew a grid on our slab of cedar.
Then it was time to drill the holes. Be sure to choose a drill bit that will hold your cake pop sticks. We like these cake pop sticks, and we used a 5/32 drill bit to make our holes.

After we drilled the holes, Kaye sanded both sides again to sand down any rough edges caused by the drill.

For a finishing touch, we screwed 2 small pieces of wood to the bottom of the slab. These little feet gave the board a slight lift off of the table.

Our final step was to clean it up with a damp cloth and then we were ready to make some cake pops to go in it.
finished cake pops and cake pop stand
What do you think? Is it pretty close to the inspiration piece?
What would you like to see us make next? Let us know down in the comments!

4th of July Beekeeping Breastfeeding Budgeting Childhood Allergies Christmas Culture/Geography/History Doctor Visits Encouragement Food Allergies Free Montessori Printables Free Printables Funschooling Gardening Gluten-Free Grain-Free Home Management Homeschool Curriculum Homeschool for Free Homeschool Organization Homeschool Planning Homeschool Printables homeschool transcript Humor Infant Kids Birthdays Language Arts Meal Planning Montessori Home Montessori Homeschooling Montessori Parenting New to Homeschooling Pets Positive Parenting Practical Life Printable Planners Recipe Recipe Cards Science Summer The Thrifty Widow Toddler Unschooling Vegan Youth sports


