
Have you ever had an appliance break at the worst possible time?
I have learned over the years that with the help of YouTube and a few basic tools, Mom can take apart most of our appliances and troubleshoot the problem. My husband, Brett, has purchased me my own toolbox. I no longer have to go searching through his tools when I need to fix something when he isn’t home.
There’s never a good time for an appliance to decide to stop working, but it seems around here that all of our appliances like to break going into a holiday weekend when no one is around for repairs.
With a family of 9, we have multiple loads of laundry per day. On a Friday night of a recent long holiday weekend, we put a load of towels in the dryer and planned to get them out the next morning. I opened the dryer Saturday morning to find damp towels. Thinking I had forgotten to start it the night before, I restarted the cycle. At the end, the towels were still wet. I tried a different setting in the hope that maybe the dampness sensor had gone, but they were still wet. It was noon on the Saturday of a holiday weekend. There was no hope to get anyone to repair it until after the holiday.

sometimes, you just can’t wait for the professionals
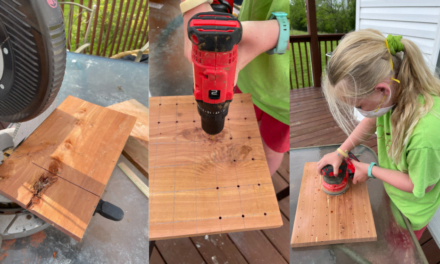
I was staring at a mountain of clothes in the laundry room. This particular appliance came with a service technician’s manual. My 12-year-old made sure to point out that I was not a service technician, but I decided to proceed with taking it apart anyway. When it comes to appliance repair, remember, safety first! Always unplug an appliance before beginning any repair. This is also an opportunity to narrate to the kids the steps, walk them through using appliance manuals, basic electrical knowledge, and more. The whole process can be an excellent homeschool lesson and could spark a new interest in your child!
Finding the instructions for getting to the heating element, my husband Brett and I went to work.
We removed what seemed to be 157 screws, the top of the dryer, the back of the dryer, and the front of the dryer. I was beginning to think we would be reconstructing this thing from scratch. The only instructions for putting it back together said “do everything in reverse order,” but we had it apart!

where do you get appliance parts for diy appliance repair?
Following instructions in the service technicians manual, Brett determined that the heating element had gone out using a multimeter. Like most families, we did not have an extra dryer heating element handy. Normally, if I need to repair something immediately, I check with our local appliance repair shops to see if they have the part I need in stock. Luckily, Brett works with someone that does appliance repair on the side and had the exact part that we needed. A quick trip to his house was all the shopping we needed.
If I am repairing something that can wait a few days for fixing, I check sites like Amazon or eBay for replacement parts. You can sometimes find substantially cheaper parts on these sites. Of course, take note of shipping times and return policies.
Buyer beware. Most of the less expensive parts are aftermarket parts – not OEM parts (original equipment manufacturer.) What’s the difference? OEM parts come from the original equipment manufacturer, are more expensive, and are guaranteed to fit and perform. That said, aftermarket parts often work just as well! Reading reviews are worth the few extra minutes
After picking up the heating element from our parts angel, we had to further take the dryer apart to get the old heating element out of the dryer. We removed more screws, took other pieces out, and finally were able to remove the heating element.
how to get your appliance back together?
Once we got the new one in place it was time to start rebuilding our dryer. What we found was as we were removing screws we had placed them all in two piles, one in front of the dryer and one behind it. We did not look closely enough as we were removing them to realize that they were different sizes. A whole lot of trial and error went into the reassembly but we were finally able to get it put back together with only 3 extra screws.
One tip to avoid having to rely on trial and error is to assign each screw a number. Write the number on two pieces of masking tape – one for the spot the screw goes and the other piece to attach to the screw. You could even tape the screws onto a sheet of paper to keep them organized and further label the paper with the section where they originated.
This was not the first dryer I have ever worked on, but I do think it was the most complicated to take apart and get back together. For appliances that I don’t have a service manual, I turn to Google and YouTube to help troubleshoot the problem. Plug the manufacturer name, appliance name, and model number in, and you will be amazed. Chances are there is some kind soul that videoed every step of repair on that particular appliance.
Was it involved? Yes. Was it a family effort? Yes. Do I think most families can tackle DIY appliance repair? Yes. If things go sideways, you can always call your local repairman.
What repairs have you attempted? Share your triumphs, funnies, or frustrations in the comments down below!

Amanda Kaye
Catch more of our adventures on my author page.
don’t miss a thing!
sign up for weekly tips and freebies


