This year, my parents gave my kids a new swing set as a combined birthday gift. We have outgrown the small metal one they gave the kids eight years ago and decided to build something larger. My mom told me to draw up the plans, and they would purchase the materials. I had been collecting new swings over the last year as I found them on sale and knew we would need a big swing set to fit them all.
As I started researching plans, I ran across Eastern Jungle Gym brackets and decided to use those to design my plans. I decided that we would need three different sections to hang the swings. I found a kit that included enough brackets to build two sections and just needed one extra middle piece to make a third section. The brackets are made to fit 4×4 and 4×6 boards, so the construction should be pretty straightforward, or so we thought.
I ordered the brackets and waited for a pretty week to get started. When it looked like we were going to have a few warm dry days, my husband picked up all the lumber we would need. Since my parents were giving this to the kids they were excited to help build it.

getting started
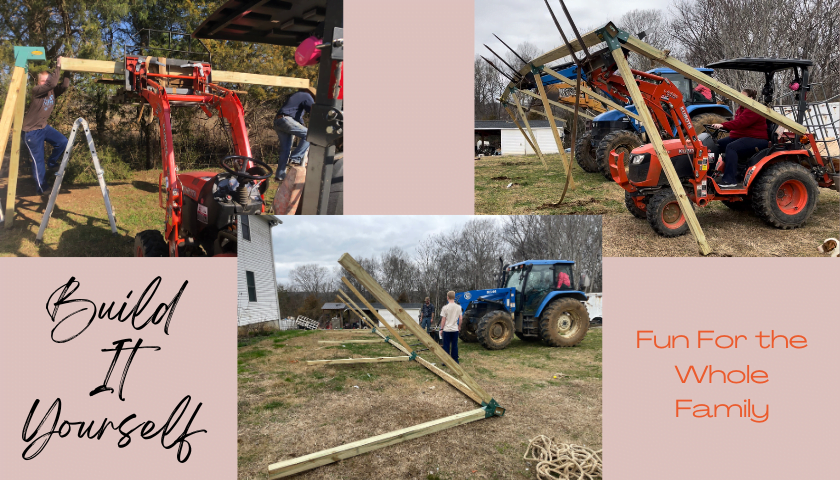
We picked out a place to put it and got to work with assembly. Our original plan involved putting the 4×4” legs into the brackets and then standing it up to slide the crossbar into the brackets. The 4×4 legs went into the brackets perfectly and we had no trouble getting all of that bolted together. We had all 4 of the “A” frame legs built and we were ready to add the crossbar. This is where things took a crazy turn. We had a small tractor with a front-end loader to lift the first 4x6x12 into the air.
The front-end loader of the tractor didn’t get quite high enough to get the board into the bracket so we lowered it back down to find some pallets and boards to lift it higher. We got the board higher but still couldn’t get it in. The 4×6 boards were a tighter fit than the 4×4 and there was no way we were getting the 4×6 in easily or with it 8 feet in the air. We tried multiple things to make it work before giving up for the day.
When my husband got home from work he took all of our “A” frame legs back out of the brackets to see if he could get the 4×6 boards into the brackets. He was able to get all 4 of the brackets in place on the boards and left the rest for us to continue building the next day.

trying again
The next day my parents came back over and brought a wonderful helper that works on the farm for them on Tuesdays. My Dad brought his tractor to help lift the swing set higher. We decided that the place we had originally planned to put it had too much of a slope so we needed to move it to flatter ground. Once we had all the 4×6 bolted into the brackets we needed to move the 36-foot section to a different part of the yard. Six of us were able to pick it up and slowly walk it to the new location.
Once we had it in the general area that we wanted it, we started bolting the legs back in. Once finished we had an upside-down swing set that we needed to lift and flip over. My Dad guided the front-end loader of the tractor under the center 4×6. He then tied a rope to the other two sections to hopefully take some pressure off the center. As he slowly started to lift the front-end loader, the center beam began to bow from the weight of the outside sections. He let it back down, and we decided we would need a tractor to lift each section.
Luckily, I live close to family and my uncle was able to bring his backhoe to help us. With 3 tractors now in place to lift the 3 sections of 4×6 (and all the adults holding their breath hoping it wouldn’t all fall apart), we were able to slowly lift the entire swing set and get it set into place. The hardest part was done, and we let out a huge sigh of relief.
adding braces and stakes
The next step was to add braces to the sides of the “A” Frame legs. We used 2×6 boards to add two braces to each “A” frame set. We placed one 2×6 toward the top of the board and another 2×6 about 45 inches below that one. After we placed all the braces, we moved one section at a time to get it in the perfect location. Next, we drove stakes into the ground and attached them to each 4×4 post.
adding swings
Now we were ready to add some swings. The length of the sections varied slightly based on how far the cross bars went into each bracket. We measured them all and picked the largest section to hang two saucer swings. In the smallest section, we added two regular swings and a swing bar. In our third section, we will be adding a cedar swing and something small beside it.
The kids love it and are outside every chance they get.

materials
- 2 – “A” Frame Brackets
- 2 – 90o Brackets
- 3 – 10’ x 4” x 6” boards (we used 12’ x 4” x 6”)
- 8 – 8’ x 4” x 4” boards
- 4 – 12’ x 2” x 6” boards
- Deck Screws to attach 2” x 6” supports
- Swings that you want to hang (traditional swing, web swing, bucket toddler swing, trapeze bar, tire swing, etc.)
- Hardware to attach swings to frame
- Cordless Drill and attachments

Amanda Kaye
Catch more of our adventures on my author page.
4th of July Beekeeping Breastfeeding Budgeting Childhood Allergies Christmas Culture/Geography/History Doctor Visits Encouragement Food Allergies Free Montessori Printables Free Printables Funschooling Gardening Gluten-Free Grain-Free Home Management Homeschool Curriculum Homeschool for Free Homeschool Organization Homeschool Planning Homeschool Printables homeschool transcript Humor Infant Kids Birthdays Language Arts Meal Planning Montessori Home Montessori Homeschooling Montessori Parenting New to Homeschooling Pets Positive Parenting Practical Life Printable Planners Recipe Recipe Cards Science Summer The Thrifty Widow Toddler Unschooling Vegan Youth sports


